Enable dynamic image banners on your hubspot emails, landing pages, websites and blog posts
Hubspot 🤝 Wafrow dynamic images
Last updated: 14.02.2025
Functionality
Dynamic images simplify repetitive marketing tasks, such as creating new ads for each sale or SEO pages for different cities
By integrating Wafrow with HubSpot's marketing tools, you ensure a consistent user experience across emails, landing pages, and mobile apps.
No engineer? No problem. No designer? No problem. No translator? No problem.
Use Cases
Travel firm needs city specific SEO / SEM landing page headers
Use your own images or AI with brand guidelines

Ecommerce firm needs new sales emails and landing pages every week
Build a campaign template only once and personalize for each user

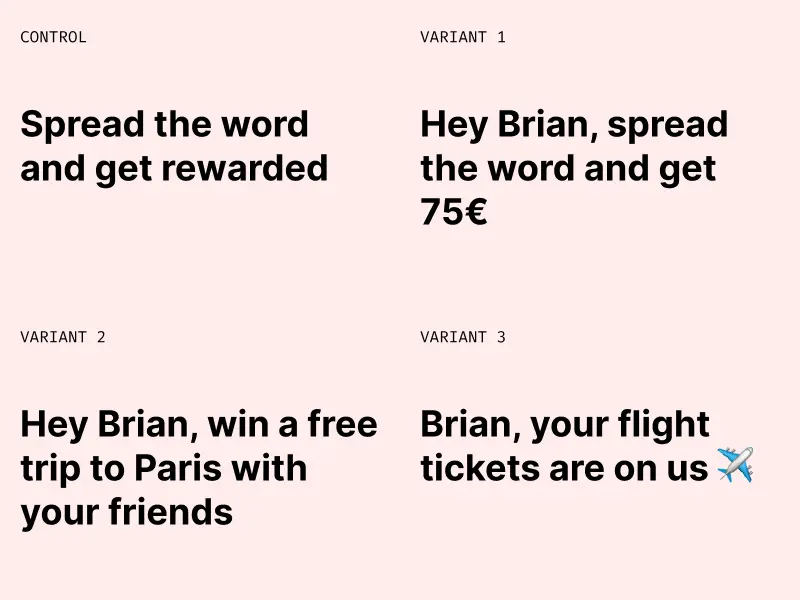
D2C firm wants personalized creatives for their referral program
Use personal data from HubSpot to create targeted email campaigns and landing pages for AB testing
Jewelry firm wants to use instagram posts to boost landing pages
Easily pull in external content like google maps reviews, instagram posts, x posts

Usage guide
Installation
Install module from hubspot marketplace
Once you click install, the module is added to your email, blog post and landing page builder
Usage
Here's a video showing this in more depth visually
<iframe class="youtube" src="https://www.youtube.com/embed/ghUSAUsVG5c" title="Hubspot Wafrow Integration" frameborder="0" allowfullscreen ></iframe>- Create a new email from Marketing (left sidebar) > Email
- Use any template of your choice
- In the screen to add module, click more. It will show Wafrow Personalized Images as a custom module you just installed.
- Drag and drop into the template per your wish
- There are 5 variables you can customize
template_id: by default, we pick the one on our home page. Please edit it to the banner template you created in your Wafrow dashboardpersonalization variables: this is how you can use hubspot crm properties to fill values.firstname[text]={{ contact.firstname }}is a representation oflayername[property] = hubspot variable. You can add multiple variables by adding&and combining them e.g.,firstname[text]={{ contact.firstname }}&city[opacity]={{ contact.city }}alt_text: important for screen readers and users in need of visual assistanceimage_width: in case you'd like it to be different than the templatelink URL: landing page the user should land on after clicking
Landing Pages / Website Pages / Blogs
- Create new landing page via Content (left sidebar) > landing page (or other types)
- Add a new module (left sidebar). Wafrow Personalized Banner module is present in multiple headers (design, media) or you can search for it directly via the search bar
- Use exactly as you would in email. The video above covers both landing pages and emails.
One last thing: open graph images
Wafrow automated banners can also be used to generate automated open graph images on landing pages. Open graph images show on facebook / twitter / linkedin as snippet previews for content. E.g.,

This makes the content more clickable and easy to understand for users. The process of enabling it on Hubspot blogs / landing pages is simple.
- Click on settings on the top right while editing landing pages
- Open advanced settings and in the Advanced section > Head HTML, add meta properties of this form:
<meta property="og:image" content="https://wafrow.com/i/WAFROW_BANNER_TEMPLATE_ID?LAYER_NAME[text]=page_meta.html_title">
<meta name="twitter:card" content="summary_large_image" />
<meta name="twitter:image" content="https://wafrow.com/i/WAFROW_BANNER_TEMPLATE_ID?LAYER_NAME[text]={{ page_meta.html_title }}" />
In the code above, replace the WAFROW_BANNER_TEMPLATE_ID and LAYER_NAME with your own branded design
Happy exploring!
As usual, in case you get stuck anywhere, please reach out to [email protected] or via slack for enterprise users.